If you’ll remember back a couple of months back during my LastWave posts, I mentioned that one of the two big challenges with creating LastWave was being able to hand the user an SVG. At the time of writing that post, my best solution was to use the “Chrome SVG-crowbar”, which, while solving the problem, was obviously not a perfect fix and left me unsatisfied. I’ve since been mucking around with SVG conversion and file saving and happened to run into a neat trick that allowed me to (partially) overcome the issues I was having.
$(“#svg_dl”).html($(“<a title=”file.svg” href=”data:image/svg+xml;base64,\n’+graph_data.base64+'” download=”svg.svg”><button class=”btn btn-primary”>Download vectorized SVG</button></a>”));
This is definitely a bit of a hack. Essentially what you do is this:
1. Take your already created in browser SVG and convert it into base64 (I’m using Base64.encode() from http://www.webtoolkit.info/javascript-base64.html)
2. Now take that base64 text and insert it manually into an <a> tag while letting the browser know that you’ll be downloading a file from it named svg.svg
3. When you click this link, the browser will now take that base64 information and download it into a file named svg, thus providing the end user with an svg of the file.
Sneaky, right?
I know it also seems like the perfect solution. But unfortunately it has one big problem. Since all of this is done on the client side (as with everything else in LastWave), Chrome and other browsers crash or freeze if the image size is too big. Unfortunately, “too big” is even a graph of a year of listening history, which is one of the benchmarks I was trying to offer. I’m therefore currently looking into taking a step in the direction I didn’t originally want to go: handling the file download on server side.
I’ll make a post when and if I end up making progress on this.
Quick little update: I’ve just released my first iOS game: One Tap Adventure!
This project was done in Objective-C using the SpriteKit libraries. It took Joe Crozier and I about 3 weeks to complete the game, during which we made all of the art and programmed the game. This is both of our first experience attempting to market an iOS game, and it’s proving to be a very educational experience.
Some thoughs/musings:
– Our game had a few bugs left over, one of which being that landscape mode was completely broken. This is to be expected and didn’t phase us much
– The game needed an instruction page. Without an explanation beforehand, most people couldn’t grasp the concept behind the game.
– We’ve got an undeniably good idea here. A bunch of the guys on my ultimate team have played the game for upwards of 15 hours now, which definitely means that there is some potential. The key now is to get the game out there!
– Some people just won’t understand the point of the game
If you haven’t already, make sure to check it out!
For a more technical view of the app, check it out on my projects page.
Alright, first actual blog post of the new school year. I’ve got a lot to write about and a big list of blog posts I’d like to write, but I’ll try to keep them on topic and relatively concise. One of the things that I really wanted to do this year was decide a purpose for this blog. At this point it has been kind of all over the place: a few of my posts were life posts, while others were guides explaining my code.
After thinking about it for a while, I decided I really don’t want this blog to be a personal blog so much as a resource. My life isn’t particularly interesting so there’s no reason that anyone would really enjoy reading about my adventures, whereas some of the things I do on the computer might just be helpful to others in the future. With that in mind, my plan is to make my blog a mix of:
1. Guides for things I know how to do
2. Discussion on programming concepts
3. Thoughts/Reviews on libraries/code, etc.
Expect my first blog post of the new year sometime this week!
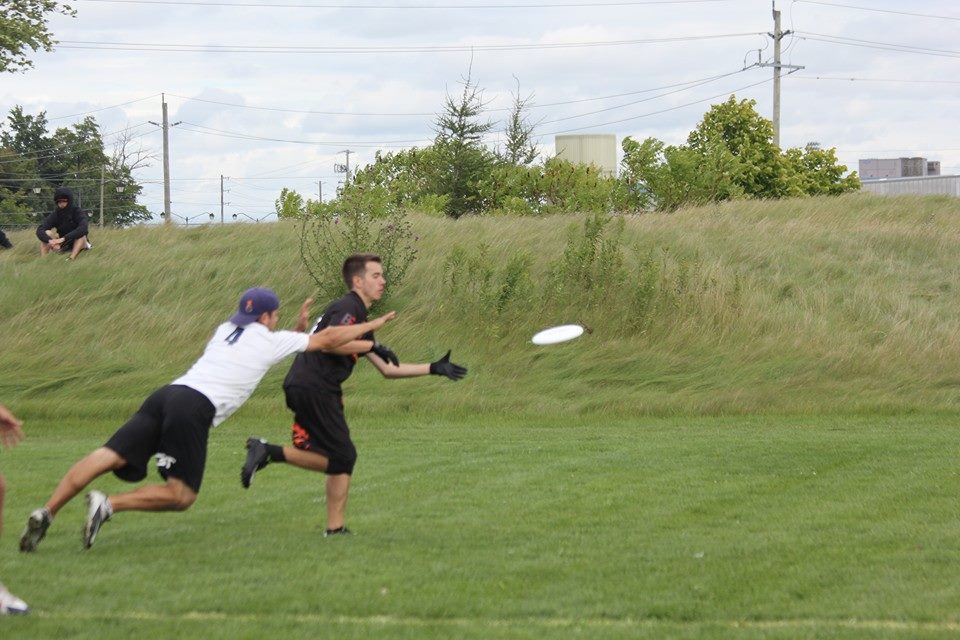
This is the second ultimate related post, outlining my experience at CUC 2014 (Canadian National Championships for ultimate).
Background
Up until now, I’ve only ever played in junior nationals. Even though I’m still 18 years old, because of the year I was born in, I’ve been forcibly removed from the 18 and under bracket and put in the adult league. This means that although I’m still 18, I’m playing against 25 year olds who are bigger and have more experience than me. Despite my competitive nature and the enjoyment I’d probably have stomping everybody in juniors, playing a year of varsity ultimate and a summer of adult ultimate has really improved me a lot more than if I was playing against 18 and under players. Unfortunately, this means that at CUC this year, I was not only the youngest player on my team, but also one of the youngest competing. This provided a challenge for me and I’m overall pretty happy with my performance.
The tournament
CUC this year was in Waterloo, and unfortunately it landed on a chilly weekend with lots of wind. After playing all summer in mild Vancouver summer conditions, this was a bit of a shock both to my team and to me. We had just spent all summer training in very low wind, and were then forced into 35kph winds. As my team is one of relatively low skill, fundamental throwing and catching became a big problem in the wind. Due to the cold in the morning of the first day, I opted to wear my friction gloves (the first time I’ve actually used them at a tournament). I wear them mostly because my hands have poor circulation, and as a handler having cold hands is incredibly debilitating; while this was the main reason for the gloves, they also provide a bit of extra grip which doesn’t hurt when the disc is a bit more unpredictable. I ended up wearing the gloves for the rest of the tournament as they didn’t seem to be negatively impacting me at all.
I’m happy to say that after the first few games, I had mostly adjusted to the wind, keeping all of my throws low and snappy and taking a bit of power out of my downwind hucks (while generally avoiding upwind ones). Unfortunately, as a team, our fundamental skills were still a bit slow to develop: we still had many unnecessary drops and fumbles. It quickly became apparent that the people who could adjust the fastest to the wind conditions would be the ones who got the most playtime: I ended up playing every offensive point in the tournament for Refinery.
The second day, while not a good one for our team, was one of the best days of ultimate I’ve ever played. Due to the continuing wind, many teams attempted to play zone defense, attempting to cause turnovers by forcing tough throws between handlers. Our offensive line, after struggling with zone the first day, came out incredibly strong the second day, shredding zone to pieces and generally tiring out defensive lines that attempted to play it. A mixture of handler crashes and swings with well timed mid pops meant that no zone lasted very long and our turnover count against zone was pretty low. Because our team is on the lower end, our best handlers generally get put on O line, while the defensive handlers are mainly made up of cutters who have good throws. This became very apparent in the second day, as our D line struggled to convert turnovers into points. Our games ended up being slow losses as our offensive line inevitably turned it over once or twice.
Our third day was much more of the same, although much of the team was now frustrated with our continuing and glaringly apparent issues: fundamentals and defensive breaks. While we actually played pretty good ultimate, I know that many of our players were a bit frustrated with our lack of success.
Mooresey
I had the privilege this tournament to play with a pickup from Montreal (who happens to be my last year’s coach), Greg Moore. As a two time Team Canada player, and an offensive cutter, he had a lot of advice to share about O line and strategy. I learned quite a few new plays over the tournament and he really helped solidify zone offense for our team. I generally like to play pretty laid back and calm (as an O line handler, a hasty drop can be incredibly costly), but Greg pointed out that sometimes moving quickly opens up opportunities that otherwise wouldn’t be there. For example, if the other team turns it over near their end zone, quickly picking it up can take advantage of the confusion as the opposing team attempts to find their checks and turn what could be a tough endzone to a quick point. For the rest of the tournament, I spent a lot of time thinking about the situations in which being hasty was helpful and when it was detrimental.
Throwing in the wind
I don’t have that much experience throwing in windy conditions, but as it quickly became apparent that our team would not be competing for a spot in the finals, I focused in on using the opportunity to improve my throws and catches in the wind. This involved changing the edge on my flick slightly (more IO, a lot more snap), and changing my backhand (lower release, tons of snap). A lot of being a good handler is being able to adjust to the wind, and I found that I was pretty successful at changing the edge and speed of my throws depending on the current conditions (up/down/cross wind). The one throw that I still need a lot of work on is my upwind flick break. Because I release it so far away from my body (and low), I find it hard to keep the edge down and the disc ends up popping up in the air
I’ve just returned from the 2014 Canadian Ultimate Championships, for which I essentially took a week off all programming to play ultimate. For those of you completely uninterested in this sport, please ignore this post.
Ultimate is a relatively new sport, which is played with a frisbee (yes, like the one you throw at the beach). It plays similarly to football, but without tackling- contact is much more similar to soccer (bodying, etc.). It’s been a growing sport, especially over the last couple years, with two vibrant pro scenes with the MLU and AUDL, which have been relatively successful across all of North America. Vancouver has two pro teams, the Nighthawks (MLU), and Riptide (AUDL), both of which have reasonably large followings, although these followings are still mainly made up of ultimate players. I won’t go too much more into detail about what ultimate is, but if you’re not convinced as to it’s viability as a sport, just check out this video: https://www.youtube.com/watch?v=kzOFaUac1dQ
I’ve played ultimate since grade 8 but only very casually. In grade 12 I took it more seriously and in the summer of 2013 (last summer) started playing in the club scene. In North America, there are currently 4 different “tiers” of ultimate, each of which involves different skill and different commitment. There is local ultimate (VUL in Vancouver), varsity ultimate (university), club ultimate (summer), and pro ultimate. My first season as a club player, I made it onto Misfit, the 2nd best team in the Vancouver area, and we went on to take 2nd place at BC Regionals as well. Our national showing was an unfortunate 9th, but playing for that summer really opened my eyes to the potential of ultimate.
When I went to McMaster, I immediately joined the ultimate team there, where I was met with open arms (as there are relatively few people coming to university with prior ultimate experience). Our team played at CUUC (Canadian University Ultimate Championships), and placed 7th/8th, which was surprising for our University which typically places lower. Playing over the summer and then at University convinced me that this was a sport that I wanted to put a lot of effort into, as I found it very enjoyable. The ultimate community, being still relatively small, is very warm and tight-knit. Even after playing for only a couple of years, at Nationals it was hard to walk for more than a few minutes without seeing someone I knew and stop for a conversation. As someone who’s other hobby is spent mostly sitting down (programming), having a sport that I genuinely enjoy is great and gives my life a lot more balance. Ultimate is by no means an easy sport, in fact it involves more running than most sports I can think of. During a point, cutters (one of the two main positions) spend most of their time sprinting, stopping, then sprinting in the other direction (“Making a cut”).
I’ll make another post soon about my overall experience at CUC 2014.
One of the greatest features of graphing libraries like d3.js/Rickshaw is that the image they create isn’t just a png or a gif, but an SVG, which means that it is vectorized. Vector images have “infinite resolution”- as you scroll in, the lines don’t become more pixellated. Find an image on the internet and zoom in on it (Ctrl + Scroll up) and then try to scroll in on my site header. You’ll notice that my site header maintains crisp lines regardless of how far you zoom in, whereas most images just become pixellated.
With something as pretty as a wave graph, having a vectorized image is a big plus, so I wanted to make sure that people could save their creation as an svg. Easy, right? No.
So close, yet so far…
SVG files are actually just XML files. Try opening up a .png with notepad and you’ll get a mess of characters, but try opening an svg and you get clean code split into paths. When d3.js creates a graph, the svg code is actually in the browser. Literally all someone would need to do was inspect the source of a page and copy/paste it into a text file and save as .svg to get their vectorized image! So how hard could it be to let people save the image themselves? Apparently, very hard.
Here’s what needs to be accomplished:
1. Send *something* the string of text that was generated by d3 (the svg code)
2. Package the code, save as svg, send to user
Language
Javascript doesn’t provide data download functionality (this is probably for the best, for security reasons), and from my research I couldn’t find anything with PHP that would allow me to do what I wanted. There *are* some tools that would let me make files using javascript (e.g. Node.js), but since I’m not actually running the server myself, I can’t run them on my current hosting plan. I finally stumbled upon someone trying to accomplish the exact same thing as me, though.
I thought this would solve all of my problems, so after learning how to set this up on my own site, I uploaded it and tried. I had to tweak the code a bit because of some errors (I don’t know perl, so I was kind of editing their code in the dark), but eventually I got it to the point that it worked for most graphs (it seemed to fail on larger ones). I have since tried to tweak it to work again but instead just broke it completely. Once I have time, I’d like to go back and fix it, but I’ve found a simple interim solution that should solve most of my problems.
This is a little addon that I found that perfectly accomplishes my goal, except it only works on Chrome. Considering that Chrome has 60% of the market share as of May 2014, I’m not terribly unhappy with forcing users to use it for now (especially since LastWave isn’t being used ALL that much), but I’d like at some point to go back and fix it up.
I’ve been compiling a list of cool resources for various programming things I’m interested in and I’ve compiled them into a page of links. I figured it might be helpful to someone (maybe?) so here it is:
This is the first post of two on the algorithms I used for lastwave.
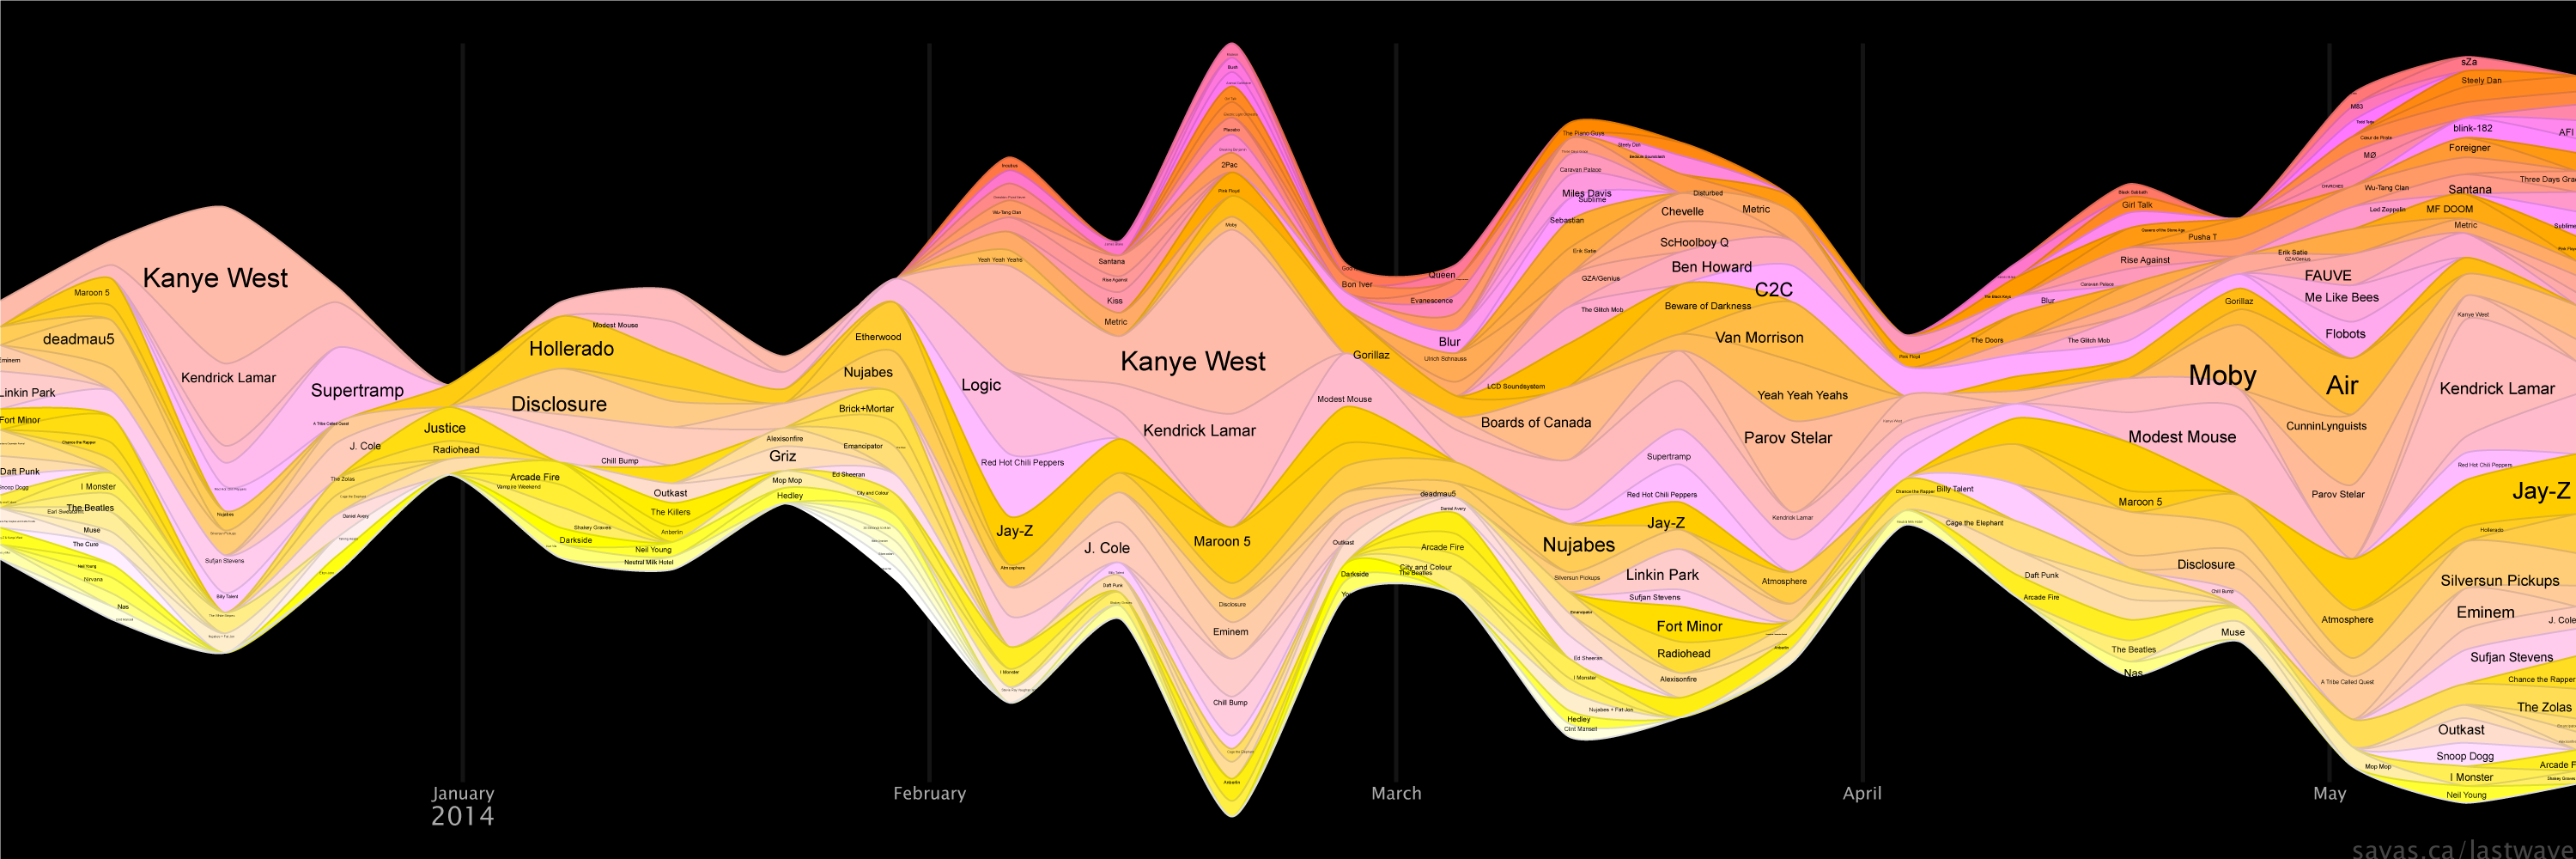
Using d3.js and rickshaw.js, it was really easy to make a bezier curve wave graph. Rickshaw has a built in label system that shows which graph you’re looking at when you hover over it. My first instinct was to modify the built in code to try to get it to place the text based on the curve, but unfortunately that kind of led to a dead end.
Placing Text
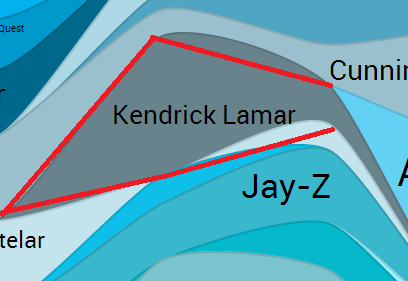
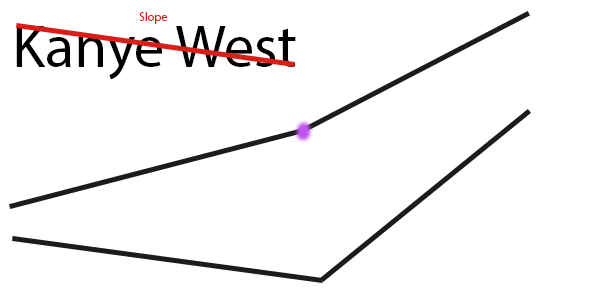
Let me use this image to illustrate what I’m trying to do. Here’s a curve that is part of a graph. This curve is already drawn using rickshaw, but the challenge is now to place text in such a way that the artist’s name fits within the curve.
Challenge: Place artist name within the curve
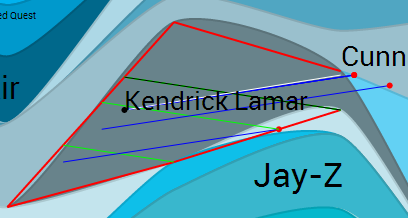
Thinking up a way to solve this problem was pretty difficult and I’m still not sure that I did it the best way. My eventual decision was that the best way to solve this problem was to treat the bezier curves like straight lines, like this:
Approximation of the bezier curves (in red)
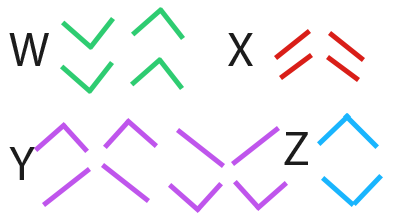
This way, I could use the equations of the lines (y=mx+b) to calculate the best position to place the text, as well as how large to make it. The key revelation was that I would need a different algorithm for each unique situation, based on the slope of the line. There are 4 lines and two different slopes (positive and negative) possible for each line, so 4^2 = 16 possible combinations. Luckily I realized that there were distinct groups that I could treat similarily, and cut it down to four line types, as follows:
The four groups of line combinations
Now I just needed four different equations/algorithms to calculate the position of the text.
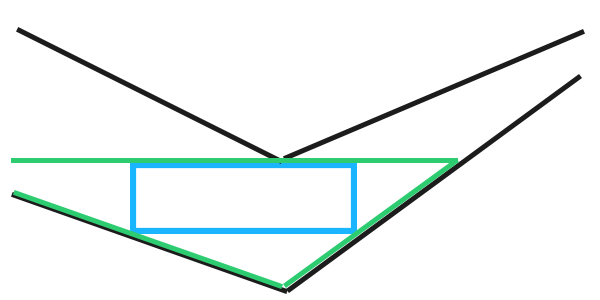
“W-type”
The key behind this one was that you could turn your bounding area into a triangle by cutting off the outward facing sides and turning the area into a triangle. At that point it was just a matter of placing the text within a triangle which is relatively easy.
“X-type”
This was one of the more difficult ones to figure out. Depending on how the line is set up, there could possibly be _no_ best place to put the text (if the distance from each line is equal all the way across, the text will be max size at any point).
I finally decided to first find the point on the line that has the maximum horizontal distance from the top bound to the bottom bound, and then draw the text around this line.
“Y-type”
This is the most complex (and cool) algorithm used in the text placement. This is best illustrated with an animated gif:
1. Draw a line from our start point away from that side.
2. Once that line collides with an edge, we pretend that our diagonal line creates a rectangle. Our new start point is vertically opposite to our collision point.
3. Draw a line from our new start point with an opposite slope to our first line. Once again, wait until this line collides with an edge.
4. Create a new start point at the point vertically opposite to this new collision point.
Animation of the Y-type text algorithm
This process is repeated until you end up with a “bounce” which is when this function continues to bounce between 1,2, or 3 of the same points (illustrated below is 1). The bounce point is generally very good at maximizing text size.
Real demonstration of the algorithm
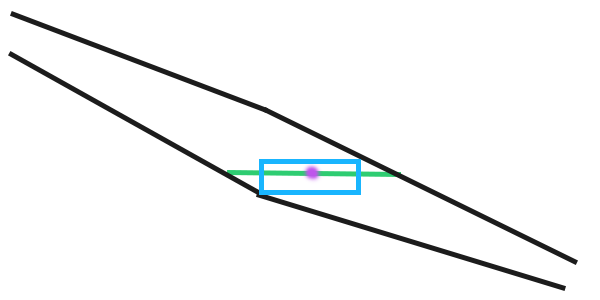
“Z-type”
Z-type was the easiest of all of them. To place the text, I simply took a midpoint between the ends of the top and bottom lines, and kept increasing text size until it didn’t fit anymore.
Unfortunately, despite all of these working amazingly well on _straight_ lines, a wave was made up of bezier curves, which only approximate the straight lines to make them look pretty. Sometimes, as shown below, the bezier curve could be very far away from it’s straight line equivalent indeed. Luckily, the movement of the bezier curve can be predicted, so at the end of each text placement algorithm, I was forced to place some “fudge” if statements, for example:
if
             slope of the top left line<0
and          slope of the top left line is greater than the slope of the top right line
and          slope of the bottom left line is greater than the slope of the bottom right line
and          the difference between the bottom left and bottom right line is greater than 0.4
and          the top left line and bottom left line have the same left endpoint
then
             push the text to the right and modify it's y component slightly
not an exact science, but hey, neither is a wave graph. The biggest weakness of LastWave is when text isn’t placed properly, but if I keep adding good fudge functions, I’ll eventually get to a point where it’s near perfect.
Finding the width and height of the text
Since custom fonts can be used in lastwave, I used a function to find what I called the “slope” of the text (bottom left corner to top right corner). It creates a new div with the text in it, checks what the div height vs div width are, and then removes the div while returning that slope value. Pretty cool!
String.prototype.slope = function(font) {
 var f = "24px "+font,
 o = $('<div>' + this + '</div>')
 .css({'position': 'absolute', 'float': 'left', 'white-space': 'nowrap', 'visibility': 'hidden', 'font': f})
 .appendTo($('body')),
 w = o.width();
o.remove();
return f.split("px")[0]/w;
}
To fix:
While developing this, I didn’t use functions to calculate things like points of intersection, but in the future I could cut down a lot of code fluff by creating line/point classes and passing them through collision functions. I’d also, as mentioned above, like to add more fudge functions to tighten up the text placement a bit as there are still sometimes errors that I don’t like.
When I first came up with the concept for LastWave (essentially, mimic LastGraph), I assumed that the most difficult part of making it would be the graph itself. As tends to happen with projects, I totally misjudged this. Using rickshaw.js and d3.js, I was able to get a functioning graph running in very little time. I then had two main challenges:
1. Place the artist names in the graph 2. Allow the graph to be exported/printed/turned into an image
Over the next few days, I’ll make two posts outlining the strategies I used to accomplish each of these things.
I’ve got an idea for a game that I just have to get out of my system. One of those ideas that might not actually be a good idea, but nonetheless *could* be cool and will bug me until I make the game. I’ll pitch the idea in a few posts, but getting started planning has created some problems.
2d to 3d
All of my game programming up until now has been 2d. I’ve tons of sidescrollers and even a 2.5d arena fighter, so I feel that I have a pretty good grasp on what is involved. After thinking long and hard, I decided that my game idea is only going to work in 3d. I know at this point that I’m going to have to at least describe the game a little bit, so I’ll do my best to explain my line of reasoning.
The game is going to be an RPG of sorts, one that involves ground targeted spells/abilities. This immediately rules out a traditional sidescroller, because you can’t actually see the ground in them. I could also have done a diablo-style 2.5d isometric-type-thing, but I always find the movement a bit clunky and doesn’t lend itself well to a game that involves moving out of ground targeted things. My final option for 2d, then, was top-down. When you think about it, very few games are top down, and there is a reason for this. All you stare at for the entire game is your character’s head and shoulders. A top down game doesn’t get to show off any nice graphics because you’re stuck staring at the ground for the entire game, left with a birds eye view of everyone’s helmets.
Because of this, I had to decide on programming in 3d (which I’ve never touched before), and so begins my saga.
3d libraries
My goal for this game was to use C++, so I immediately began looking into how to make a game in 3d with C++. From researching this, I learned that 3d is much more complex than 2d, namely:
1. Physics is dealt with in a totally different way, with much more complex algorithms
2. 3d Graphics is an entirely separate branch of 3d programming, that’s how complex it is. Just looking at one discussion on shaders makes me afraid to venture there.
3. Creating art assets isn’t nearly as easy as it is for 2d. You’ve got to be good and know your way around maya/blender
With the above knowledge, I decided that there was no way I could program the game from the ground up, I’d need some sort of libraries/tools to help me.
ogre3d
My first attempt to get libraries led me to Ogre3d. Ogre3d is a 3d graphics library that would essentially remove the need to dive into OpenGL/Directx and leave me to program the game’s code around it. 3d collision detection is fairly well documented, so I wasn’t really worried about coding that (in fact I was looking forward to it, terrain mesh collision looked fun).
Unfortunately, I’ve found myself incredibly frustrated with the difficulty involved in setting up anything to do with C++. Even though I know this isn’t the case, it almost seems anti-newbie. Even just setting up MinGW, MSYS and Code::blocks was a solid hour endeavor. My job was then to get Ogre3d working, but the tutorial is totally outdated and needs _multiple_ edits to get it working with the latest version of Ogre3d (which, by the way, only works with visual studio as an editor, no other editor). I spent about 4 hours trying to get a basic Ogre3d screen working and ended up giving up out of frustration- if I can’t even get the bloody thing to work, how can I be expected to program a game with it?
going to the dark side
As I was setting this up, little mentions kept popping up of Unity3d. I knew about it, but wanted to stay away from it if I could. I’ve always been a “from scratch” kind of guy, up until 3 or 4 years ago I didn’t want to use any libraries and just programmed using notepad. Unfortunately, because of the difficulty involved in setting up anything more complex, at this point I think I’m going to have to use it.
whelp
So that’s my feelings at this point. I’m not terribly bummed about using Unity3d, as it seems to be a really good program (and well documented!). Hopefully I can finish a prototype of this game by the end of summer to get it off my chest. I think that with Unity becoming such an industry monster, it might actually be very helpful to have experience using it. I’ll be making periodic blog posts on my progress with Unity/the game (tentatively titled “Descent”… More in a bit ;P
 http://savas.ca/blog/wp-content/uploads/2015/01/awsnap1.png 771w" sizes="(max-width: 771px) 100vw, 771px" />
 http://savas.ca/blog/wp-content/uploads/2014/08/10583818_263626650514941_1218933930316026122_n.jpg
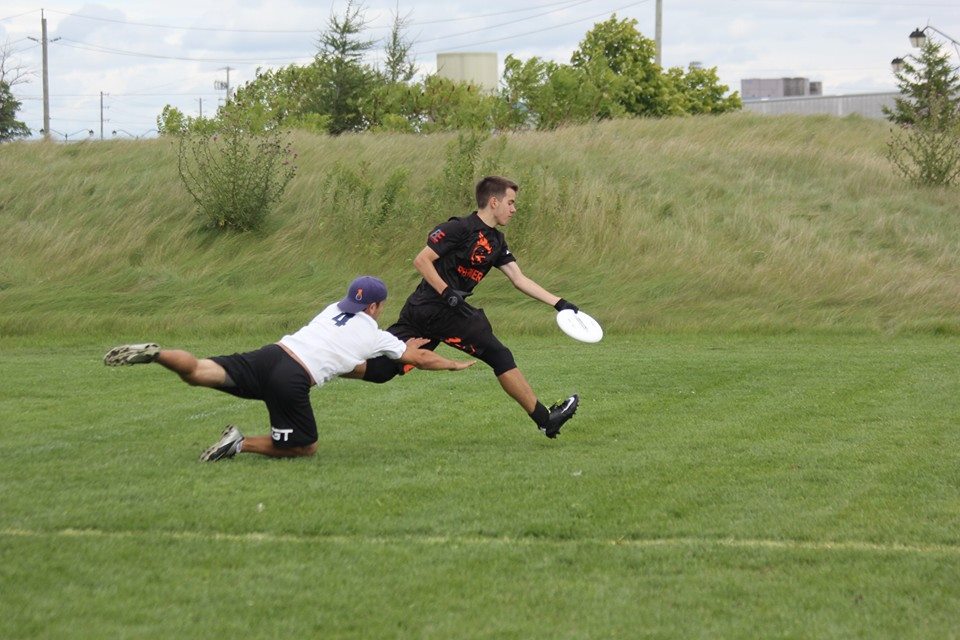 http://savas.ca/blog/wp-content/uploads/2014/08/10561605_263626877181585_8087387770451625009_n.jpg
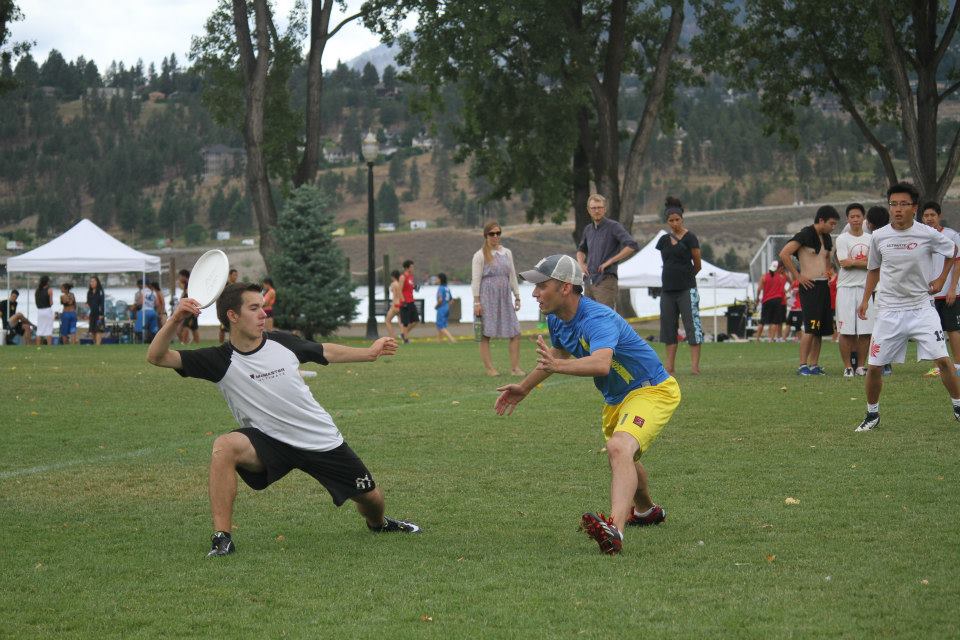 http://savas.ca/blog/wp-content/uploads/2014/08/10584037_10152579199114670_2244627851418541004_n.jpg
 http://savas.ca/blog/wp-content/uploads/2014/06/svg-vs-png-1024x589.png

 http://savas.ca/blog/wp-content/uploads/2014/05/my_wave-1024x341.png